Preparing Your Home for Photo Day!

There are a multitude of mixed emotions that come with selling a home. The biggest roller coasters often come from the preparation it takes to get your house “photo and showing ready”. 🎢

It is hard work! There are long days and heavy decisions of what to keep and what to part with as you declutter, reorganize and prioritize what you really “need”. It will all be worth it! The long days will make a difference! Potential buyers will notice - you will reap the rewards as you begin to receive an influx of offers!

If you are doing it right, by the time you are done you will probably feel exhausted and have adopted the mind set of “it is what it is”. That is okay! You have done what you can and every little bit helps! I am here to tell you - we need a little bit more!😬

We use the term “photo day” however, this is the day all media is produced. Our team conducts Matterport Virtual Tours, facilitates photography, and occasionally coordinates videography of your home. Consider this day a dress rehearsal for the upcoming in-person showings. The way you prep today will be the way you prep for showings, so we want you to be fully prepared. To make this easier, we have compiled a list of “must do’s” to follow!

Before I give you this list, it is important to understand the photographer’s role. True professionals have a combination of artistry and engineering running through their mind. It’s their job to capture the feel of the home while focusing on the important areas that will pull a buyer off the internet site and into your home for a live showing. The photographers will make sure the angles chosen show the full picture of each room that accurately portrays the space. Doing so is not easy - it takes focus. Your job is to make sure the photographers do not have to focus on making sure the following is complete. Let’s help them help us! 📸

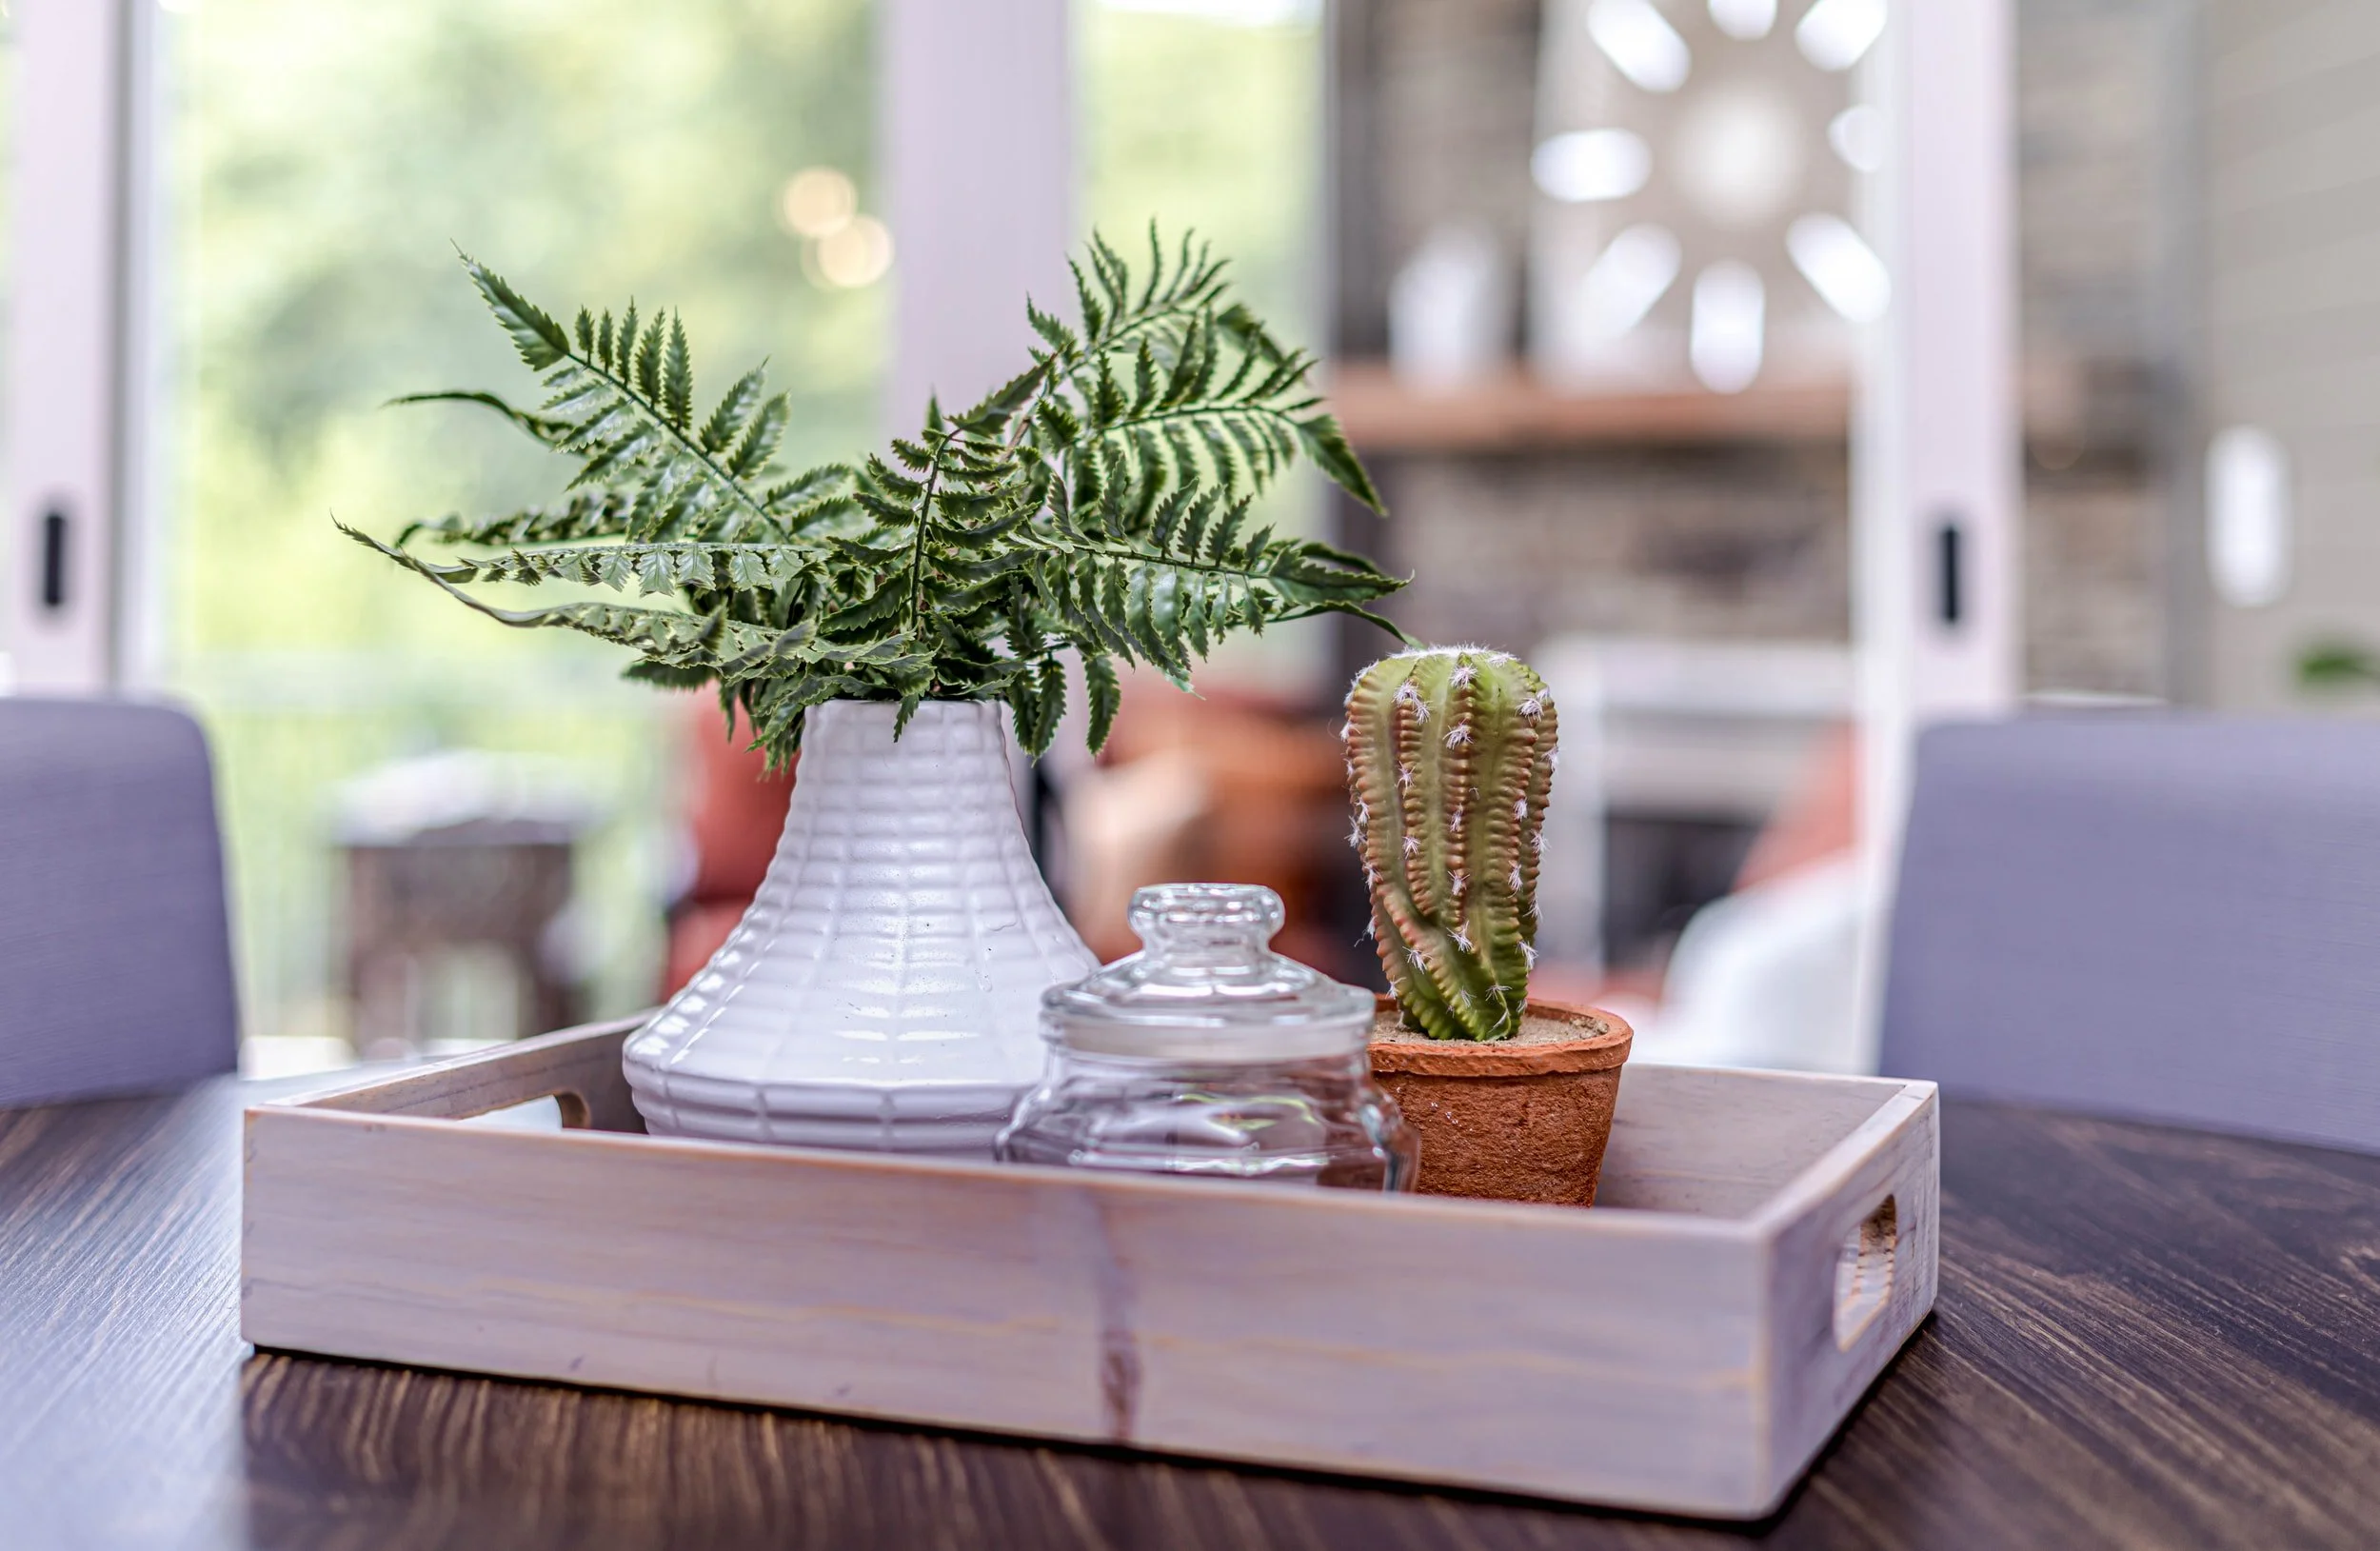
Here are nine easy to follow steps following to ensure the interior of your home is dressed to the nines!

  1. Clean kitchen counter and sink (remove sponges, dishes, dish racks, and soaps)

  2. Clean bathrooms including sinks, faucets, and mirrors

  3. Hide ALL trashcans and laundry baskets - place them in nearby cabinets or closets

  4. Replace all burnt out bulbs. Make sure all bulb colors match in each room -White, bright daylight bulbs are preferable

  5. Turn ON all lights including lamps, under cabinet lighting, microwave light, and all light fixtures and turn OFF all ceiling fans

  6. Open all window treatments

  7. Remove all pet items - beds, toys, crates

  8. Turn off all TV’s and computer screens

  9. Make all beds!

For easy access, download the perfect checklist to keep on your phone!

Take a peak outside! Your lawn may need to be tidied up too. Here are seven steps to make sure your yard is in tip-top shape!

  1. Tidy up the yard and landscaping

  2. Have your grass freshly cut and edged

  3. Clear all cars from the driveway

  4. Sweep off decks and porches

  5. Hide all garbage cans and lawn equipment or children’s toys

  6. Remove grill and fire pit covers

  7. Open up patio umbrellas

    For easy access, download the perfect checklist to keep on your phone!

Tackling this list will help maximize your photographer’s creativity! Your photos will do exactly what they are intended to, which is make the buyers fall in love with your home before they even set foot in the door! ❤️🏡

Thee best part is, once this list is complete you have completed your showing dress rehearsal! Now you know exactly what to do and can replicate this for each showing that is scheduled!!

How I Fell in Love With Yoga

In the beginning of my yoga journey, honestly, the goal was to be more fit and help with weight loss.  I had heard it was great for staying in shape! So, I started with ONLY that in mind. 

I was hesitant, because I knew it would be challenging and I questioned how much it would benefit me if I wasn’t great at it… but I also knew keeping with the same routine was no longer working if I wanted to change my lifestyle. So, I signed up with a studio that had great online reviews. 

At my first class it became clear to me this would be no ordinary fitness routine.  I felt out of my comfort zone to say the least.  However, I stayed optimistic. I grabbed a mat, rolled it out in the BACK of the studio and began stretching as I saw the other students doing.

The instructor came in quietly, dimmed the lights, began playing relaxing music and sat on her mat. 

She spoke in a rather quiet, calming voice as she began instructing us into our poses.  I had no clue what I was doing, so I tried to follow the other students.  I almost tipped over a couple of times and got lost between poses. Needless to say, it was far more difficult than I had initially thought!  

Ok, let’s talk SHAVASANA… my FAVORITE! It’s not so much a yoga pose, but more of a meditation pose. This is where you lay completely flat on your back, arms, and legs out, eyes closed, rest from your yoga practice and meditation begins. Lord, I was so relieved to be on the ground!  

The breath is heavy at first, but it begins to slow, your body relaxes, and your mind begins to focus. For just those few moments, for the first time in a long time I was completely still and, in the moment, focused on nothing but my body, my mind and breathing.

Once it was over, it took me a moment to open my eyes and get up, not just because I was tired from my first yoga practice (which, trust me… I was), but because I was completely at ease. 

After just one practice I noticed a difference, physically and mentally, a sense of peace took over and it was in that moment I realized I would continue my yoga journey!

I needed to become more physically fit, but what I didn’t realize is how much I needed to just feel at ease and quiet my mind.  The body and the mind are very much intertwined, so when we ignore the needs of one the other suffers.  It seems that most of us feel the need to constantly stay connected to everyone and everything around us and we don’t seem to have enough time in the day to take care of ourselves.

I believe everyone can benefit from learning to take a little time to be physically active, calm the mind and live more in the here and now, even for just a few moments a day!

Staging: Things That Make This REALTOR®’s Heart Soar!!

Valentines’ day is upon us! What an amazing day to make the people you care about feel extra loved. Taking a little bit of time to plan, and make the day special for your loved one, makes ALL the difference!  

Much like planning for Valentine’s Day, putting a little love and time into your premarket prep, can really make those buyers FALL. IN. LOVE!!

Ready to push those buyers over the commitment line?  Use these tips to get your home ready for the market.

1. Paint all the walls in your home neutral corresponding colors. Tans, whites, and grays are always a safe choice. Paint trim and ceilings bright white! This will make the home feel clean, fresh and open.

2. Add new greenery to elevate the space, bringing the serenity of the outdoors in.

3. Take down all personalized items down- Family pictures, monogramed items, certificates… anything that may keep the buyer from envisioning themselves in the home. A few family photos are fine if they are updated and in the appropriate locations.

4. Clearing the clutter!  Stick to 2/3 items per space… the goal is to help the buyers see there is opportunity to add more stuff.

5. Closet floors cleared- I know this is a tough one, just try not to toss your shoes in the closet and maybe instead line them up against the wall. The more stuff people see laying around, the less storage space they will think the home has. And we don’t want that!

6. Laundry room decluttered. No one wants to see your undergarments hanging to dry.  Use baskets to help hid the cleaning supplies on open shelving.

7. Garage tidied up. Out of sight out of mind… not when it comes to buyers! They want to see behind every door. Including the garage, that you have been filing up over the last 5 years.

8. All counter tops should be cleared (minus décor) Clearing those countertops makes the kitchen look clean and bigger. Plus, we need room to add that greenery.  

9. Making sure blinds are in good shape. If you own a furry companion, you likely know what I’m talking about.

10. Deep cleaning- Don’t forget to dust off the ceiling fans and wipe down those baseboards!

Every house is like a different person… unique shapes, sizes, and colors; it’s important that your to-do list is based on your home specifically.  So, there may be more you need to address, but the best way to find out is by contacting a REALTOR® like us and working together to get the most out of your home in the least amount of time! Call us anytime! We are here to help!

5 Tips to Avoid Wire Fraud in Today's Market

You never think it’s going to happen to you…It all starts with a suspicious email that looks innocent enough. You are to wire the closing costs and/or downpayment to your title company or risk delay in the closing date! You are busy, tired, and perhaps just ready to close on your new house. You don’t think about the fact that the email might not really be from who it says…after all, the address line looks real enough. Right?

Wrong! Scammers are tricky and here’s how to avoid losing thousands of dollars to their schemes!

5 Tips to Avoid Wire Fraud

  1. Where are your devices logged in and when was the last time you ran a security check? It might be time to change some passwords. That would be the first thing to do before responding to the email that is possibly a scam.

  2. Do NOT reply to the email ever if something seems a little off. Your bank, your credit card companies, and your lender all have phone numbers. Look up the phone numbers, and the emails that they might really have on their website. Know who you are dealing with first.

  3. Get the name of everyone you would be expecting to contact you, and forward the email to the real company if you are unsure, but again, don’t hit reply to that email address.

  4. Be suspicious of any changes sent to you in email unless your real estate agent has contacted you first. Why would the lender or title company start changing things without your real estate companies knowledge?

  5. Beware of phone calls unless you have also called them. There is a way to “spoof” a number and make it appear it is from somewhere legitimate, but ask for their name and contact information and tell them you’ll call them right back (after you call your agent, bank, title company or whoever it is that they are saying they represent).

It does happen more than you would think! But it is preventable by being focused and not just scanning emails but really truly reading them and making sure you are diligent in your actions!

If you think you are a victim of wire fraud, please file a complaint with the FBI’s internet crime division.

If you are interested in learning more, watch this video here from the National Association of Realtors.

~Aimee Halpin, Contributing Author, Marketing and Communications

The Basics of House Prep

By basics, I MEAN basics… like if you do nothing else, you should do these things!

Cleaning 1.png
  1. Make sure all light fixtures have bulbs AND are the same color light… especially if they are in the same line of sight!

  2. Change your air filter and clean the air filter grate.

  3. Caulking… any and all of it should be clean! Don’t say you have scrubbed it and can’t get the black out… if that’s the case, it needs to be redone! This includes showers, tubs, kitchen and bathrooms sinks and countertops! If you decide to DIY the replacement of the caulk - make sure it looks good! No sloppy jobs here!

  4. Wipe off all ceiling fans. First dust, then wipe with a wet cloth.

  5. Put all seasonal decorations away.

  6. Go through the house with a disinfectant wipe and clean ALL handles and light switches. You won’t believe how much those can be overlooked when doing basic cleaning. (This includes the garage, too!)

  7. Deck out your front porch! Put out a new front door mat, fresh paint, nice clean door handle, no cobwebs in the light fixtures, etc. The front porch and door is the first impression. The buyer will often stand there for a minute while the agent is getting the key… you better believe they are already deciding if this is the house for them!

  8. Make sure you have nice and clean blinds. If you don’t, simply remove them and make sure any holes are patched and painted. If you feel like you HAVE to have them, then opt for a curtain that you can be pull closed. Blinds are great if they are good shape… they are a major distraction if they are not!

  9. Organize your closets! Linens should be neatly folded. Toiletries and cleaning supplies should be minimized and in baskets. You want the buyer’s to see the space you DO have… not feel like you DON’T have enough space. Stuff on the floors of closets should be minimal, if not completely empty.

  10. Add fresh layer of mulch to all flower beds… I don’t care what time of year it is, THIS is IMPORTANT!

53-web-or-mls-417Bryanctce020.jpg

Bottom line if you do NOTHING else, CLEAN CLEAN CLEAN! A Magic Eraser and 3 pack of Clorox wipes from Costco (or whatever organically friendly version you want to use… I’m not that girl) should be your best friend! Once those are gone… you know your house is ready to list!😉

It's the Final Walk Through🎶

Ok, so you may or may not be old enough to hear iconic song from the band Europe in your head when you read that title, but nonetheless you get my point! It’s the FINAL walk through.. FINAL being the key word!

The final walk through is your last chance, as a buyer, to inspect the home which within a day or two (closing) will be yours FOREVER… to have and to hold from this day forward, for better, for worse, for richer, for poorer, in sickness and in health, to love and to cherish, till death do you part, according to God's holy ordinance…. OK OK, maybe not that serious, BUT you should treat it that way!

Here are 10 things you NEED to do during your walk through:

2.png
  1. Check agreed upon repairs. Your agent will bring a list of the requests for your review, but it is your responsibility to make sure the items are complete to your standards. The best way to ensure this is done, is to hire your home inspector to come back to inspect the property. The cost of $150-$200 is relatively cheap when you think about what it can cost in the long run. If you want to exercise this option, let your agent know so they can book the inspector ahead of time.

  2. Confirm all the appliances that should convey with the home are present.

  3. Check the conveying appliances to be sure they are all operational.

  4. Check the HVAC system to be sure it is still operating. There will be certain times of the year that you can not check the heating or the cooling (depending on the temperature) so do this with caution as it can damage the unit!

  5. Check mechanical components of the home such as plumbing (flush toilets, run water, etc.), light fixtures, ceiling fans, water heater, garbage disposal, and outlets to be sure all are working as they did during the home inspection.

  6. Make sure the seller has left the garage door openers and that they work!

  7. Confirm the attic and sheds are empty! Sellers may forget about items they don’t see often.

  8. Check outside water spigots to be sure nothing has changed since the home inspection.

  9. Be understanding. Sometimes the seller has spent the last few days, and or nights, emptying an entire home. They may still have a few things left to move… it’s a HUGE and sometimes exhausting process - as you will see once you start moving. If it’s not completely perfect, it is ok! There is still time to make sure everything is done right before you move in. Your agent can ensure the expectation is set with the seller’s agent. But don’t expect perfection… even in new construction, there will be a punch list of things that will need to be done after you move in!

  10. Finally, BE READY to take a fun photo outside! This is a BIG milestone in your life! Don’t leave without letting your agent capture the moment! 📸

3.png

Once you leave the house for the final time before closing, consider it yours! As soon as you sign the deed, all the joy of home ownership are yours! This is an exciting and important part of your life so don’t get too hung up on the small details at this point in the process. Buying a home is the best investment you can make in yourself and your life. Building wealth through owning isn’t a short term game and their will be expenses along the way but if you check all the boxes above, you can be sure you did everything right… and if you have a good agent by your side, they will walk you right through the process!

Appraisals: Someone IS Coming to Judge Your House....

Make no mistake about it… they certainly are! And that is SCARY! BUT it is the reality, so let’s get READY!

Appraisers are human. They have feelings, opinions, and preferences just like we all do. It is important to understand this. It is important to also understand why we teach you how to get your house ready for a buyer showings - we are technically prepping you for the real showdown of home inspectors and appraisers!

Appraisals 2.png

The appraisers job is to validate that the house is worth what the buyer is willing to pay! So we need it to look like it did, or better than, when the buyer originally saw it.

Refer back to past blogs on Getting your House Ready for Sale and Preparing for a Home Inspection to get caught up to this point. Now I’m going to simply give you items that you MUST complete before the appraiser comes!

  1. Follow the exact instructions of how we’ve taught you to leave your house for a showing. (i.e. lights on, blinds open, beds made, toilet seats down, clean, etc.)

  2. Create a list of all the repairs you have made to UPGRADE the home in the last 3 years. Note, I did not say “maintain”, I said UPGRADE. This includes, but is not limited to the roof, HVAC, kitchen/bathrooms, appliances, windows, hardscape, flooring, encapsulated crawlspace. Upgrades do not include painting, cleaning carpets, changing filters, re-grouting tile floors, mulching flower beds, and other minor cosmetic touch-ups. Those are all maintenance items that should be done regardless but do not add value to the home.

  3. Have all areas accessible for viewing, including the crawlspace and attic.

  4. If you have a floor plan of the home, leave that out for the appraiser. A copy of the floor plan will help the appraiser verify the square footage.

  5. Make sure all utilities are on, and the heating and air is set to an appropriate temperature.

  6. DO NOT follow the appraiser around! Everything you wish to show or tell the appraiser should be on the list mentioned in #2.

Believe it or not this appraiser has a lot of power! They have the power to make or break your deal. It is very important that you make their job as easy as possible. So make sure your house shows at it’s very best!

Richmond Adventure

Richmond Adventure

For our next adventure, the group decided to travel north toward Richmond, Virginia to check out the Mattaponi and Pamunkey River. Our destination for this trip was the South Anna River, which is a relaxing yet exhilarating 6 mile paddle from Route 33 to Route 54. The South Anna River has steady moving water flowing downriver, with numerous class 1 rapids along the way. This added a little extra excitement (and anxiety) amongst the group!

Our Maiden Voyage

IMG_6979.jpg

Our first exploration took us to Hampton, VA. The boating and kayak launch site is located at Fox Hill Boat Ramp at 365 Dandy Point Rd in Hampton, VA. There is a great sized parking lot with several launch sites for boats, jet skis and a designated launch ramp for kayaks. So easy! By the launch site, there are porta-johns as well as a small bait and tackle shop. You will find parking near the ramp to unload and plenty of parking spots to leave your car while you are out adventuring! 

It was time to load up our kayaks and set off into the Chesapeake Bay! We navigated around the larger boating docks. There were people on the shoreline fishing, but overall it was not crowded. It only took a few minutes of before we hit the open water. From there we could see the beached island, Factory Point, our intended destination for this short paddle. The island was packed on with many anchored boats and people spending their afternoons on the beach on the first end we passed. Our group decided to venture down to the other end of the island in hopes to avoid the crowds. We were met with a few other kayaks on the shore. As we paddled across the water to the far side of the island, we took in the beautiful scenery and nature surrounding us. There were a few boats passing through as approached the beach, but they maintained idle speeds through the “No Wake Zone”.

IMG_6965.jpg

  We reached the beach in about 28 minutes of leisurely paddling from the launch site which was only 1.33km in distance. We dragged our kayaks onto the beach - you want to make sure you do this far enough on the shore to account for the changing of the tides. You do not want your kayak to be swept away! We strolled down the isolated part of the island until we could not go any further looking for shells and such and then headed back. As we were walking, we noticed some signs on the dunes that read “Protect the dunes- cross at access point”. Turns out the island is also a nature preserve for bird nesting which was awesome to see!

We continued walking along the beach until we reached the dune access point. Here we were able to cross through the dunes opening to the other side of the island. We reached our destination! The dunes opened to a beautiful inlet where you can spend the afternoon swimming, enjoying the weather and relaxing in nature. It is a great spot for kids as well as adults to play, swim and chill. 

All in all, this trip was a major success! The total distance was about 2.66km and took about 30 minutes each way - an hour of paddling total. Our group definitely plans on going back for more trips to this beach in the future!

IMG_7126.PNG